This article contains the most detail steps for publish ASP.NET Core web application to our web server using Visual Studio 2017.
1. Initial Setup at myASP.NET
Create a website and a SQL Server database from your hosting control panel. For more details, please check below links
1. Create a website, please click here
2. Create a database, please click here
In a section following we will review some of the detail of the setup in order to get the values need to publish the project
2. Creating the Visual Studio Project
Build the project using the Visual Studio templates:
Note that, in this example, Individual User Accounts is selected for Authentication. This means that the default build will include a database context “ApplicationDbContext” and a migration for creating the Identity Schema. Once the project is created and the command “update-database” is run in the VS Package Manager Console, a local database instance is created with a set of tables associated with user identity. These can be seen by viewing the “localdb” in the VS SQL Server Explorer.
Data in VS project (left) and tables in SQL Server (right) created by Individual User Account authorization.
It is not a requirement to use individual user accounts, however if the project does not, it will be necessary to create a database context, add one or more data object, and run the “add-migration Initial” and “update-database” commands in the VS Package Manager Console in order to demonstrate the steps involving the database.
3. Preparing to Publish the Project
There are several critical, and somewhat cryptic, values that need to be entered into the VS Publish dialogs and it is useful to collect these in advance.
|
Item
|
Typical Value
|
|
1 Server
|
https://<user>-001-site1.atempurl.com:8172/msdeploy.axd?site=<user>-001-site1
i.e. https://demo-001-site1.atempurl.com:8172/MsDeploy.axd?site=demo-001-site1
|
|
2 Site Name
|
<user>-001-site1
i.e. demo-001-site1
|
|
3 User Name
|
<user>-001
i.e. demo-001
|
|
4 Password
|
**********
|
|
5 Destination URL
|
http://<user>-001-site1.atempurl.com/
i.e. demo-001-site1.atempurl.com
|
|
6 Database Connection String
|
Data Source=SQL5040.site4now.net;Initial Catalog=****;User Id=****;Password=****;
|
For more details on how to find some of this information please click here
The database connection string can be found by selecting the “Databases” icon from your Control Panel, and then the “Connection String Examples”. Use the option titled “ASP.NET”.
Note that this string includes the user name and password credential for the database (not to be confused with those of the site.) Your user name will be shown correctly but you will need to fill in your password.
Database Connection String: The database connection that will be used after the site is published. Note that this value is not stored in the project file “appsettings.json”, which stores the “Default Connection” to the local database.
For more details on how to find your database connection string please click here
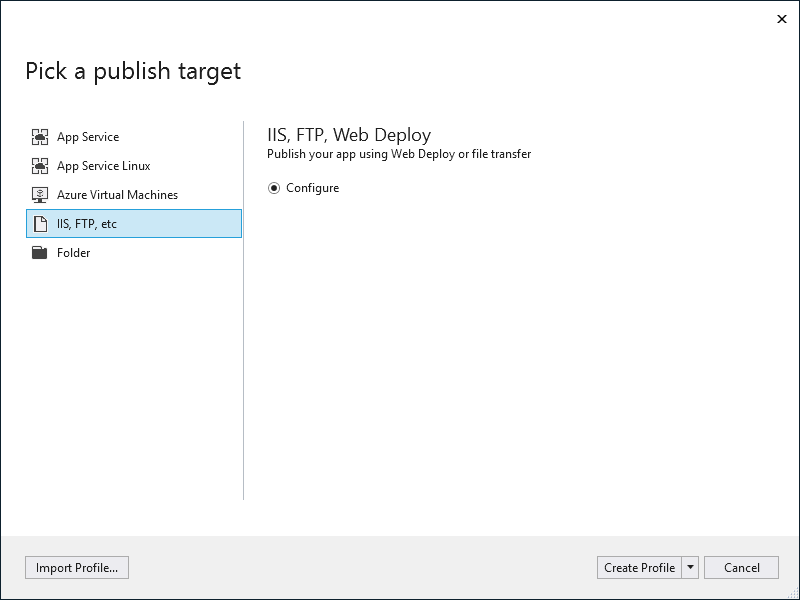
4.Publishing the Project
Right-click on the project name in the VS Solution Explorer and select Publish from the context menu.
There are various target options; use “IIS, FTP, etc.” which is for Web Deploy. Select the Create Profile button.
This will start a new profile named “CustomProfile”. (You can rename it later.)
On the first screen, set:
- Publish Method: Web Deploy
Use the values collected in the previous section, keyed by thee numbered boxes, to fill in the fields.
Check the Save Password checkbox.
After completing the first screen, select the Validate Connection button to confirm that it is working before continuing.
Press the Next button to get to the second screen.
On the second screen, accept default values:
- Configuration: Release
- Target Framework: netcoreapp2.1
- Deployment Mode: Framework-Dependent Note: you can choose 'Self-Contained' if the core version is still not installed to the server.
- Target Runtime: Portable
Expand the lists on the second screen and check all of the boxes on both screens. Note that VS may fill in the database field(s) with the local connection. This is incorrect; both the Databases and the Entity Framework Migrations text fields should contain the path to the database on the server.as captured in the number 6 box above.
Select the Save button to complete the profile and return to the main screen.
Use the Publish button to publish the site to your account
Once you have created a profile you can reuse it every time that you publish by simply running the Publish command.
Observer the Output window in VS to see if the publication worked properly.
Note: If you get a message that “ERROR_CERTIFICATION_VALIDATION_FAILED” select the Configure link and re-run the Validate Connection command on the first screen. Then save, and run the Publish command again.
Article ID: 1910, Created: January 5, 2017 at 1:02 AM, Modified: May 6, 2020 at 7:59 AM